1. 개요
Environment는 ApplicationContext을 통해 여러 빈을 모아 하나의 프로파일로 만들어진 환경을 말한다. 각 개발 단계에서 필요한 빈들을 프로파일로 묶고 필요할 때만 사용할 수 있다. 내가 프로파일을 지정해야 그 프로파일 속 여러개의 빈을 사용할 수 있다.
2. 프로파일
2.1 프로파일 만드는 법
2.1.1 Configuration을 통한 설정
여러개의 빈이 모인 환경을 말한다. 아래와 같이 사용한다.
@Configuration
@Profile("test")
public class TestConfiguration {
    @Bean
    public BookRepository bookRepository() {
        return new HyunjunRepository();
    }
}
만약, BookService에서 BookRepository를 주입받으려면 에러가 발생한다. test라는 프로파일을 지정하지 않았기 때문이다.
@Service
public class BookService {
    @Autowired
    private BookRepository bookRepository;

    public void printBookRepository() {
        System.out.println(bookRepository.getClass());
    }
}
빈을 찾을 수 없다는 아래의 에러 문구가 뜬다.
Field bookRepository in com.spring.springcore.BookService required a bean of type 'com.spring.springcore.BookRepository' that could not be found.2.1.2 Bean에 직접 등록하는 법
매번 Configuration으로 프로파일을 지정하면 불편하다. 보통 Configuration으로 빈을 등록하지 않기 때문에 어노테이션을통해 빈을 등록할 때 프로파일을 지정할 수 있다. 아래 코드를 보자.
@Repository
@Profile("test")
public class HyunjunRepository implements BookRepository {
}
2.2 특정 프로파일 사용하는 법
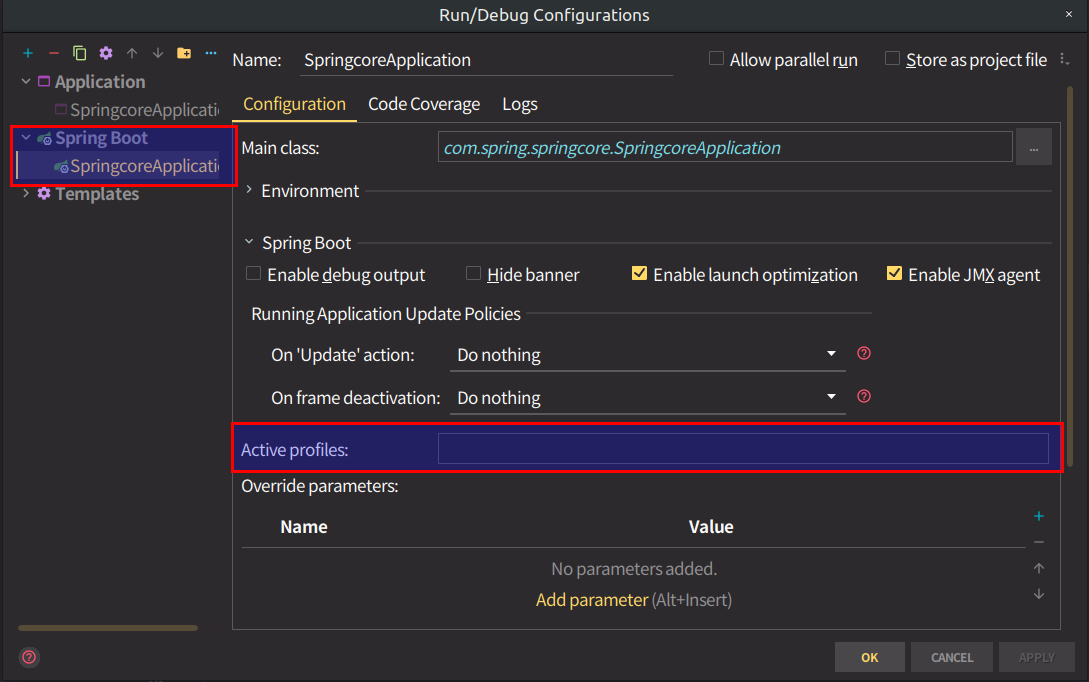
2.2.1 active profiles 사용
IntelliJ 우측 상단에 망치 표시 옆 아래 화살표 클릭해서 edit Springapplication을 들어간다. -> 현재 실행중인 application의 Configuration 혹은 SpringBoot-> active profile에 'test'라 지정.

2.2.2 VM option 사용
VM option에 -Dspring.profiles.active="test" 입력한다.

3. 프로퍼티
정확히 개념을 이해하진 못했다. Environment 속에 프로퍼티를 설정하면 필요할 때 가져다 쓸 수 있다고 한다. 설정하는 방법은 다양한데 어디서 설정했느냐에 따라 우선순위가 달라진다고 한다. 프로퍼티가 호출될 때 우선순위가 높은 곳에서 등록한 프로퍼티가 출력된다. 조금 더 공부가 필요
3.1 설정하는 법
3.1.1 VM Option
VM Option에 -Dapp.name=spring5처럼 설정한다. 이후 사용하려면 ApplicationContext 내에 Environment를 이용해서 꺼낸다. 아래 코드 참고.
@Component
public class BookServiceRunner implements ApplicationRunner {

    @Autowired
    ApplicationContext applicationContext;

    @Autowired
    BookService bookService;

    @Override
    public void run(ApplicationArguments args) {
        Environment environment = applicationContext.getEnvironment();
        System.out.println(environment.getProperty("app.name"));
    }
}
3.1.2 app.properties을 이용한 파일 설정
resource 폴더에 app.properties 파일을 생성한 뒤 app.about=spring을 지정한다.
app.about=spring이후 @Configuration이 있는 파일로 가서 @PropertySource("classpath:/app.properties")를 설정한다.
@SpringBootApplication
@PropertySource("classpath:/app.properties")
public class SpringcoreApplication {
    public static void main(String[] args) {
        SpringApplication.run(SpringcoreApplication.class, args);
    }
}
호출해본다.
@Component
public class BookServiceRunner implements ApplicationRunner {

    @Autowired
    ApplicationContext applicationContext;

    @Autowired
    BookService bookService;

    @Override
    public void run(ApplicationArguments args) {
        Environment environment = applicationContext.getEnvironment();
        System.out.println(environment.getProperty("app.name"));
        System.out.println(environment.getProperty("app.about"));
    }
}'프로그래밍 > Spring' 카테고리의 다른 글
| 20.04.13) Spring - @ComponentScan (0) | 2020.04.13 |
|---|---|
| 20.04.04) Spring - @Autowired (0) | 2020.04.04 |